How to put invite codes on business cards
When I started working on Stella last year, my initial plan was to release it as a for-charge testing service. I figured out a way to put unique invite codes on business cards and about halfway through the project I got them printed and started handing them out to people I met at meetups and other events. It turned out to be a pretty handy way to punctuate a good conversation. The only problem was that about a month before launch I decided to switch gears and release the project as an open source tool. That was a good lesson learned! Don’t give out invite codes until the product is up and running [1]. In any case, I thought I’d share the process I used to create them for anyone else that’s interested in doing something similar.
The Process
- Generate the invite codes
- Batch create images
- Print the cards with Moo
Generate the Invite Codes
I wrote a short Ruby script to generate the invite codes in the format in-XXXXXX. I added the in- to give them a little context and I chose six characters since it’s a good balance between uniqueness (31^6 = 887,503,681) and readability. I also removed the potentially ambiguous characters – i, l, o, 0, and 1 – which also doubles as a handy quick-check for bogus codes. Here’s the script:
#!/usr/bin/ruby

# Description: Invite code generator
# Usage: ruby genvites [code length] [count]
#
# e.g.
#
# $ ruby genvites 6 3
# in-5qgczr
# in-enh4v4
# in-7jjab1

LENGTH = (ARGV.shift || 6).to_i
COUNT  = (ARGV.shift || 50).to_i

# An Array with ambiguous characters removed: i, l, o, 0, 1
CHARS = [('a'..'z').to_a, ('0'..'9').to_a].flatten - %w[i l o 0 1]

def strand(len, str='')
   str << CHARS[rand(CHARS.size-1)]
   str.size == len ? str : strand(len, str)
end

COUNT.times do
  puts "in-#{strand(LENGTH)}"
end
I created an invite codes file with the following commands:
$ echo "InviteCode" > invites-2009-05-27.csv
$ ruby geninvites 6 50 >> invites-2009-05-27.csv
Batch Creates Images
I used Photoshop so that’s the process I describe here but you can use any method that you prefer. You simply need to make 50 images, each with a unique invite code. Other options include Gimp, online image editors like Pixlr and Aviary or even a Ruby/Perl/Python script.
Step 1: Create a CSV file containing the invite codes. The first line of the file should contain the column names. If you’re using the script and commands above then you will have a file with one column named “InviteCode” and 50 codes (Moo has a limit of 50 unique images per batch of business cards). However you choose to generate the file, it should look like this:
InviteCode
in-92gr41
in-6imab7
...
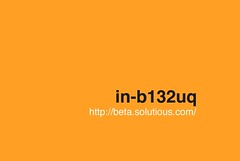
Step 2: Create a new image and add a layer with some text in it. The styling of the text will be used for the invite codes. The dimensions of the image depend on the type of card you want to print. For a business card, I used 1040 by 700 at 300 dpi (see this discussion on Flickr). Check Moo Help for information on image sizes for all product types. Of course, you’ll also need to style the image however you like (with a background image or colour). Mine looked like this:
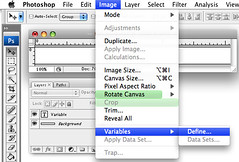
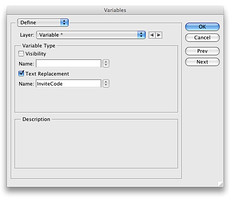
Step 3: Add a variable for that layer using Image > Variables > Define. The name of the variable needs to match the name of the column (i.e. “InviteCode”).
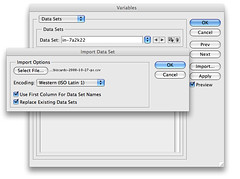
Step 4: Import the CSV file from Image > Variables > Data Sets or click “Next” in the Define screen. Click the “Import…” button and make sure the two checkboxes are checked (“Use first column” and “Replace existing datasets”).
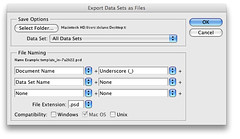
Step 5: Generate the unique PSD files with File > Export > Data Sets as Files. The default settings will name the files in the format “original-name_invitecode.psd”.
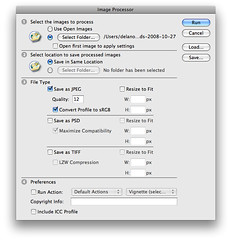
Step 6: Convert the PSD files to JPG with File > Scripts > Image Processor. Select the input folder containing the PSD files, JPG encoding, and the quality.
Take it to the printers
It’s now time to start the printing process with Moo [2]. Their interface is pretty self-explanatory so I’ll only mention a few things here.
If you’re going with business cards, they have two batch sizes: 50 and 200. Obviously it’s cheaper per card to get 200, but they have a limit of 50 unique images (i.e. invite codes) so you’ll end up with duplicates (the other card types, like the mini cards allow up to 100 unique images).
They have several ways to upload photos, including via Flickr. I chose to go the manual route and upload all 50 photos to Moo. My guess is it’s probably easier to use a Flickr upload tool, but I haven’t tried it. After you’ve uploaded the photos, you’ll be asked to “Add Text”. You can enter your business name and contact info here using one of their preset templates or you can upload another image to use instead. If you’re uploading an image, you’ll need to use the full landscape template as shown here:
The only remaining choice is the type of paper: “Green” or “Classic”. A few observations: the 100% recycled paper is chlorine free and has a flat, matte finish. The classic is “elemental chlorine free” and is a bit shiny and fancier looking. I don’t understand the environmental implications of either choice so if I don’t consider the environment, I’d choose the classic. If the recycled paper does offer an environmental benefit I’d go with that. It’s not that the green is unattractive it’s just that the classic is more attractive.
Conclusion
And that’s how I put unique invite codes on business cards. It’s a bit of work, but it’s cheap and it gives people a reason to keep your card. Just make sure you launch the product!
Update: Improved ruby code example with feedback from Wes and Filip.
Notes
[1] I kept track of the codes that I gave out so they'll still work when we do release a product. It's kind of annoying to keep a business card around for an indefinite period of time so if you have one (or had one) just send me an email whenever the time comes and we'll figure it out.
[2] I recommend Moo because I don't know of any other printer that can produce business cards with unique images for $21.99 (USD). If there are others, let me know!
